FAS7900 – A streamlined forensic acquisition system for fast, non-invasive data extraction and analysis, without the need for computer disassembly. Supporting multiple OS, it captures memory and disk images, and includes secure data wiping.
Forensic Expansion Dock – A compact solution for fast, reliable data acquisition from various storage media. With support for multiple interfaces, it ensures secure, stable, and high-speed forensic data transfer for streamlined workflows.
How to Recover Deleted or Corrupted Videos From Hikvision CCTV? (Complete-Guide)
Technical Tips
2022-03-28
CCTV cameras are the cornerstone of home and premises security. The video footage extracted from them serves as valuable digital evidence that can reconstruct the events exactly as they transpired.
In court, this is even better than having a witness retell the story.
However, even a small glitch or a moment of improper care can corrupt the footage, which could be a massive problem when trying to bring the culprits to justice. Since even a professional forensic DVR examiner can potentially get stuck when trying to recover corrupted or erased video footage from the hard drive, trying to do it yourself could do more harm than good and may even wind up making the files harder to retrieve.
When it comes to surveillance videos, since HikVision is the leading brand in the video surveillance industry, we’ve written a detailed how-to guide on how to approach the issue of HikVision DVR deleted data recovery correctly without jeopardizing the integrity of the footage.
Even if the owner takes perfectly good care of their HikVision camera, the fact of the matter is that data is being written to its hard drive all the time by the nature of its design. Old CCTV footage needs to be deleted to make room for new one.
Naturally, this puts a lot of strain on the hardware. Since no component was built to last forever, over the course of time, it may give in and require a replacement.
FACT: Any video recorder device has a limited storage capacity.
Keep in mind that video footage might get overwritten due to storage space constraints (unless, of course, you’re keen on making backups regularly).
As a general rule of thumb, it’s a good idea to do this on a monthly basis to prevent data loss.
If You Have Accidentally Deleted a File, Stop Using the Device Immediately
Whether it be due to human error or old footage being overwritten and replaced with the new one organically, the good news is, the data affected can most likely be restored.
However, you must stop using the storage medium immediately to avoid overwriting the files on HikVision’s hard drive – every minute you waste can lessen the chances of successful HDD data recovery. Remember: any bits and pieces of data that are written onto it need to be stored somewhere. To make space for the new data, the old one needs to go.
Ideally, you should have a backup restore option ready to restore deleted files, but for obvious reasons, this is only feasible when doing backups on a regular basis. At the very least, you should make a conscious effort to back up your recorded HikVision footage prior to making any major configuration changes and before formatting the device.
Although it’s also possible recover a formatted hard drive, the success is not 100% guaranteed, and the footage extracted may have missing pieces or be damaged in other ways.
Disassemble Your HikVision CCTV to Get the Files Ready for Extraction
Assuming you haven’t done this already, there are certain steps you need to take to get the files ready for extraction:
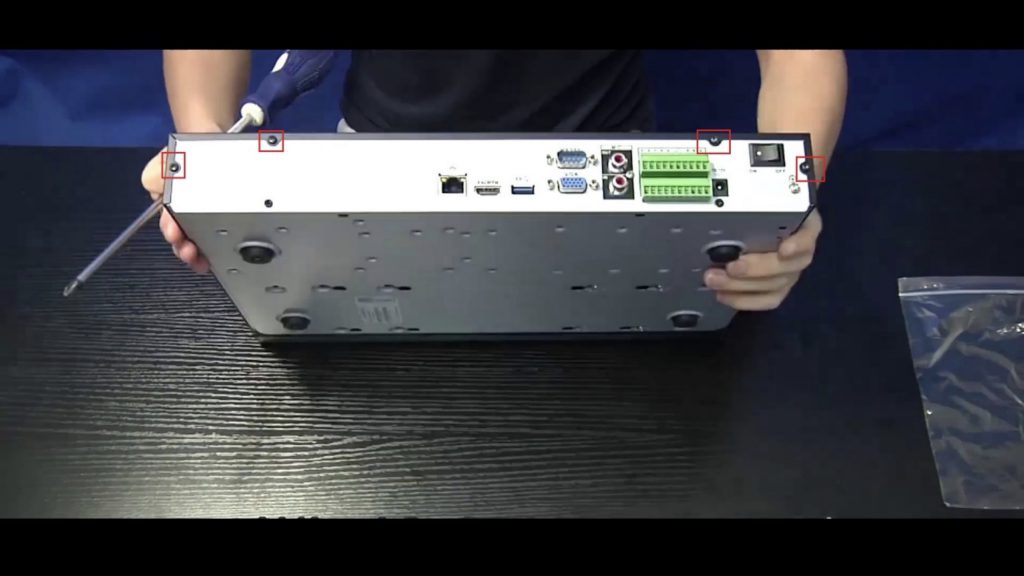
1. Disconnect the DVR unit and locate the screws
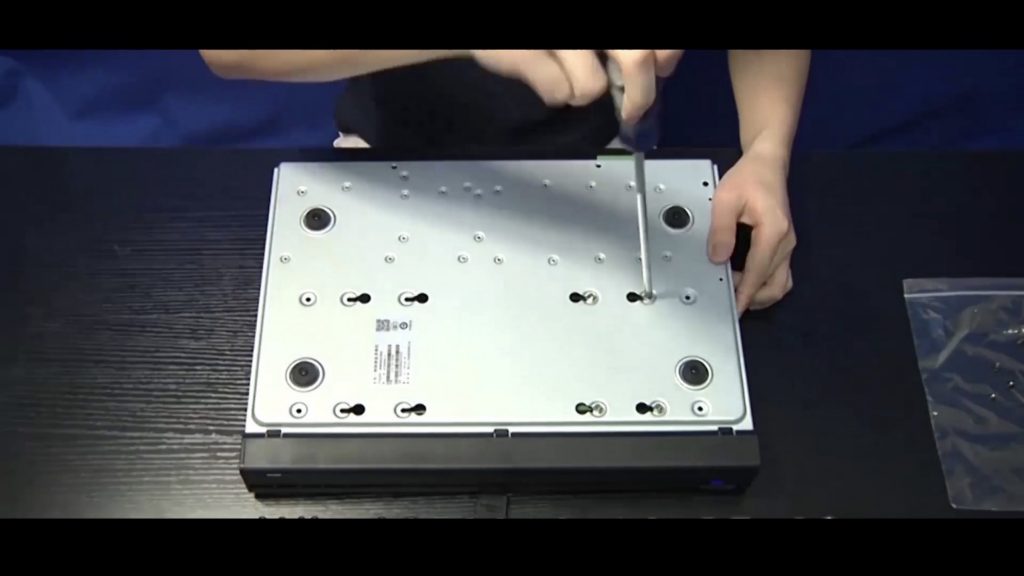
2. Remove the screws
3. Remove the cover plate
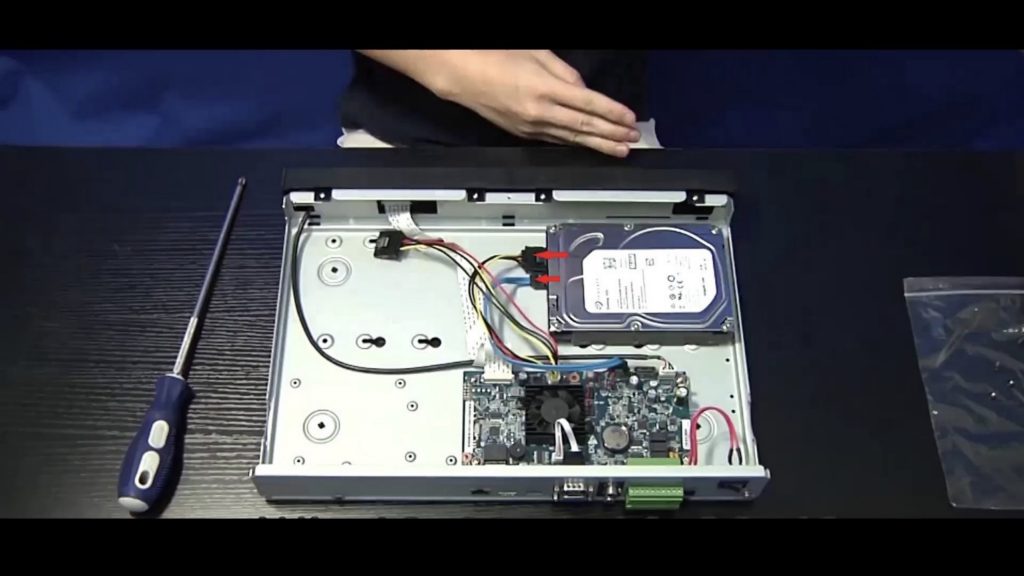
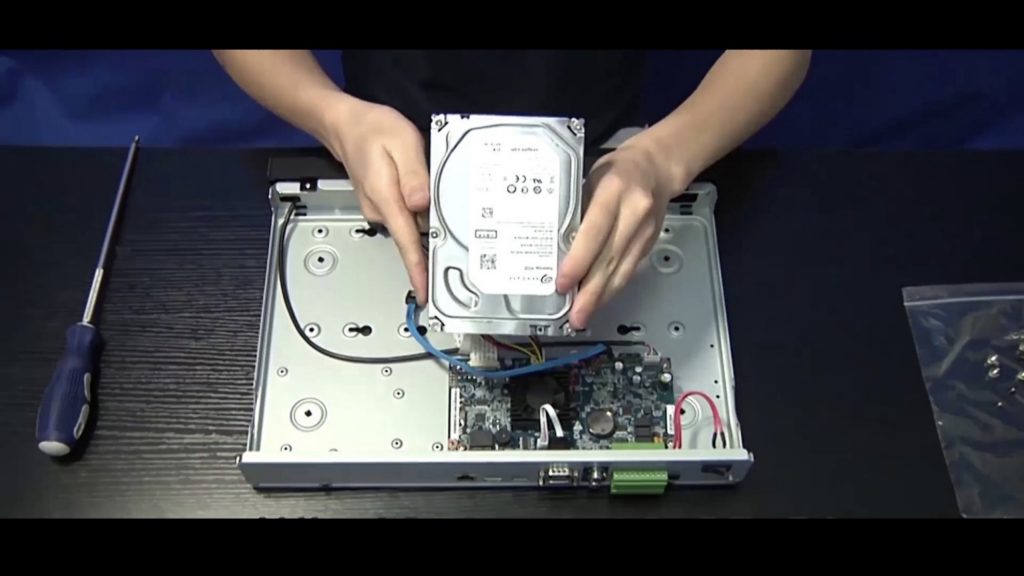
4. Locate the hard drive and disconnect it
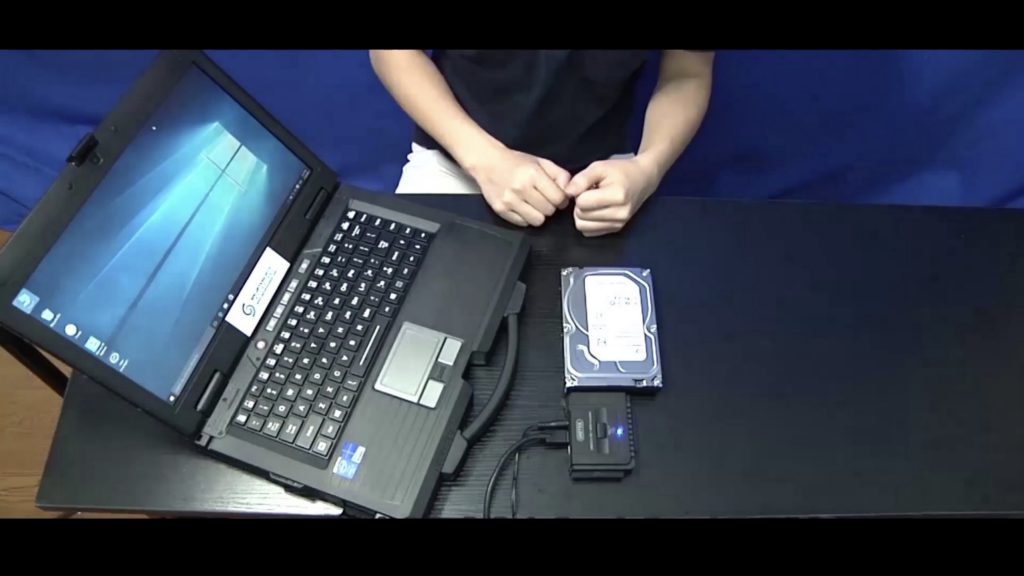
5. Connect the extracted hard drive to the computer
Congratulations! You’re now ready to recover the footage from HikVision’s hard drive.
Recover the HikVision CCTV Footage
Once everything is plugged in, you can proceed with the CCTV investigation by attempting to recover the footage you need to solve the case.
Note that, as a DVR examiner, you’re going to need some specialized DVR hard disk recovery software for the job if you want to do it in a manner that’s forensically sound and admissible in court.
Another reason why you’re going to need some specialized DVR recovery software is that HikVision CCTV cameras tend to have a file system that’s unlikely to be compatible with your device. If you’re lucky, Windows will analyze and restore footage on its own.
However, when the fate of the CCTV investigation is at stake, you simply cannot rely on sheer luck – you need professional DVR recovery software at hand.
SVR by SalvationDATA Can Recover Video Footage from HikVision CCTV Automatically
As any DVR examiner can testify, time is a precious resource during any CCTV investigation and you simply cannot afford to waste any of it. As a matter of fact, SVR for HikVision is a DVR recovery software that completely automates the process.
It can recover deleted, fragmented, and overwritten files, and comes with a built-in video player for previewing the footage restored. In case the hard drive is protected by a password, it will bypass it.
For this example, we’re going to be using SVR for HikVision by SalvationDATA and walk you through the exact DVR deleted data recovery process. It has a free trial, so you can download it and try it for free. This will make it easy to get started.
The free version of the software has the exact same features as its paid counterpart, minus the option to export the video, thus making it a valuable tool in your forensic arsenal.
All in all, this is the perfect solution for those who are facing budget constraints and those who are not necessarily from the field of law enforcement (such as government organizations).
In the next section, we’ll show you how easy it is to use SVR for HikVision in practice.
SVR for HikVision: A Step-by-Step Guide
Open up the DVR recovery software and proceed with the steps outlined below.
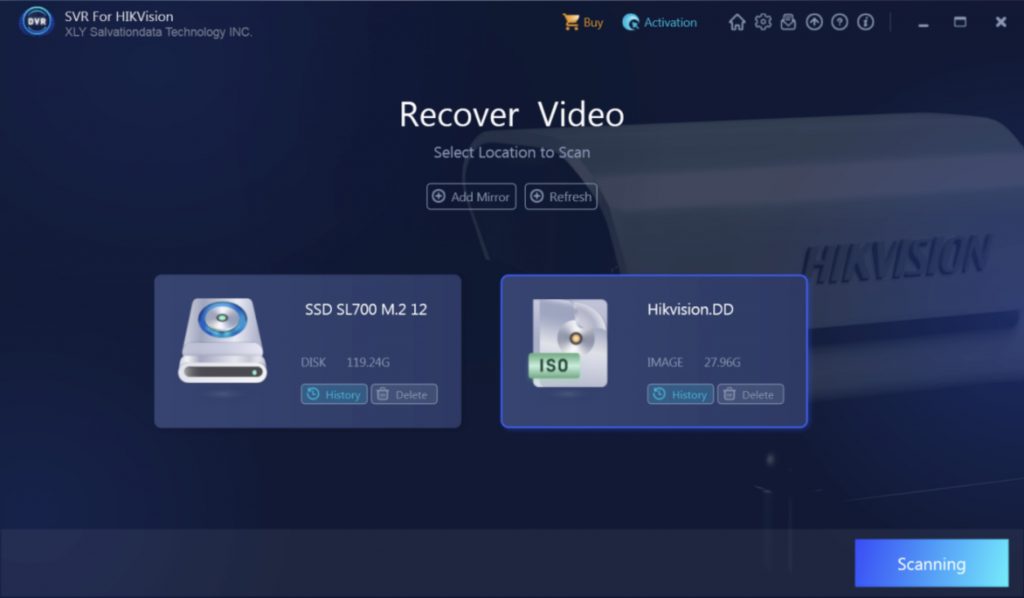
1. Select the hard drive you wish to scan
On the homepage, you will find all the connected hard drives and images SVR has discovered. In case you’d like to add more, click the “Add Image” button.
After that’s, it’s best to click the “Refresh” button to ensure that everything has loaded correctly.
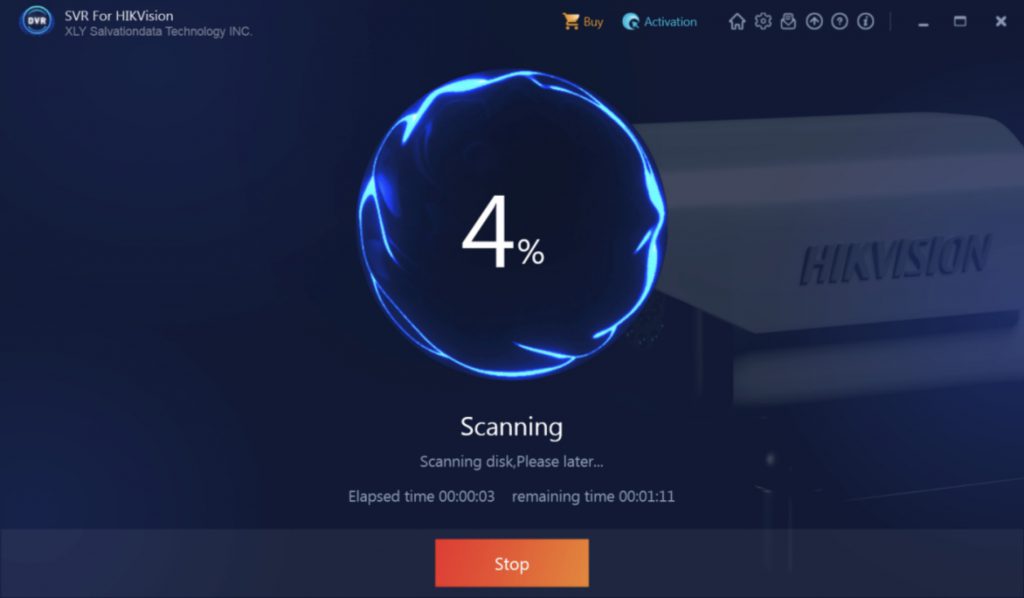
2. Click the “Scan” button to begin the video retrieval process
Give it a while to complete the HDD data recovery process. SVR also shows you the estimated time remaining, so sit back, grab a cup of coffee, and let it do the work automatically for you.
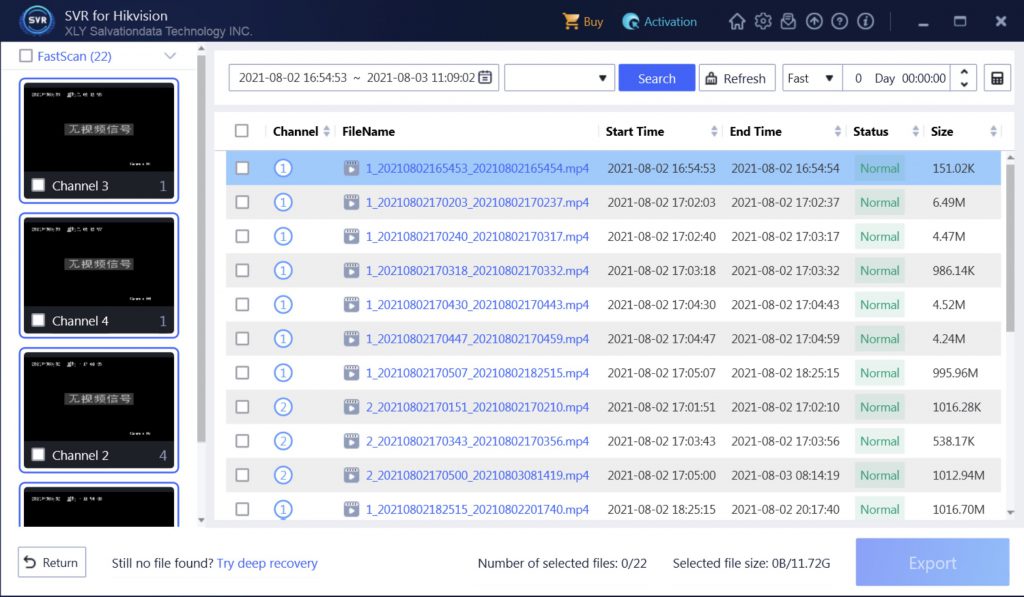
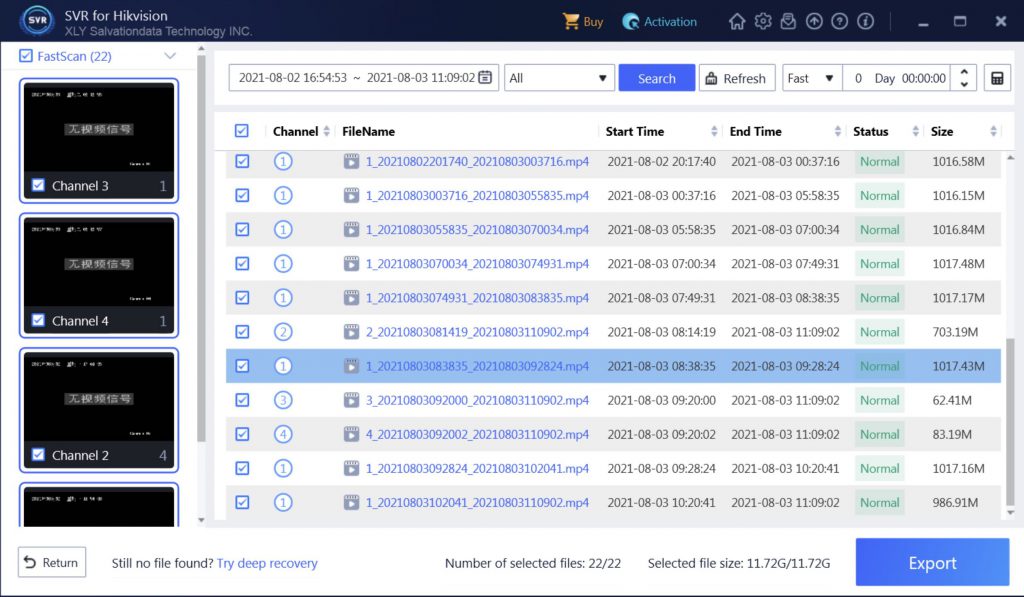
3. Review the results
After the scan is complete, SVR will display the results. From here, you can either preview the footage that peaks your interest directly or use advanced filters to narrow down the search results even more.
For instance, you can filter them by:
Status
Start time
End time
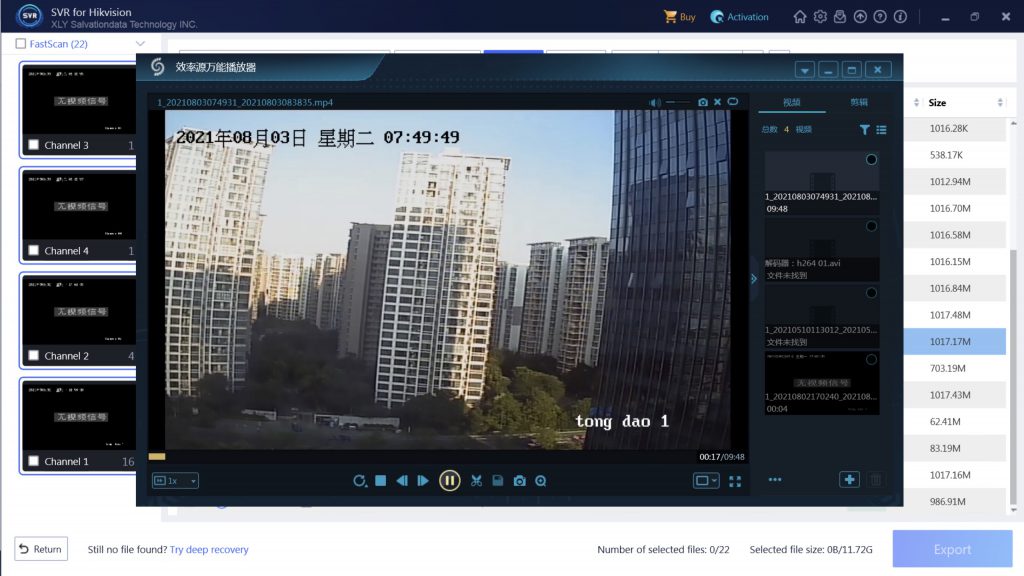
4. Preview the footage
Once you’ve found what you are looking for, SVR’s built-in video player lets you preview the footage without exiting the software.
Note that, in the trial version, you will only be able to preview the first 20% of the footage.
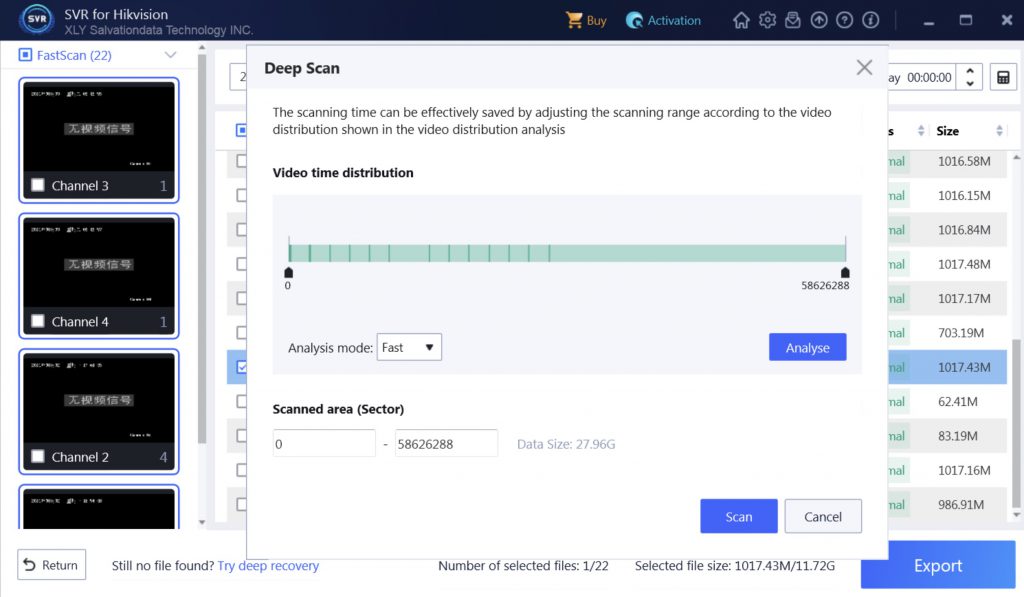
5. OPTIONAL: Run a deep scan
If a quick scan was unable to find the desired files, you can initiate a deep scan for advanced video retrieval. Depending on how much time you have available, you can choose how deep you want to go.
6. Export the video
Finally, once you’ve pinned down the file containing the exact evidence you need to reach a conclusion in your forensic investigation, simply select it and click the big blue “Export” button in the bottom-right corner of the screen.
SVR will let you choose the file path of the final export destination. Alternatively, if none is provided, it will place it in the default directory.
Note: the export feature is only available in the full version of SVR for HikVision.
HikVision CCTV Data Recovery Methods and Quick Fixes
During a HikVision CCTV investigation, there are certain data recovery methods and quick fixes you can try prior to utilizing classic data restore techniques.
You could very well find out that the CCTV video files won’t open due to a simple technicality, although specialized hard drive forensics tools will certainly make things faster and easier.
If the video footage doesn’t play for any reason, try the following quick fixes:
Method #1: Rename the file
In some cases, your media player may refuse to open the file due to how it’s named or because the extension is not quite suitable, so simply try renaming it.
Make sure no special characters are left in there. Sometimes, a triviality like this is all it takes to resolve the matter and get the video playing.
Method #2: Fix the corrupted video file header
The video file header contains essential information that’s necessary for the video to play. For instance, it states how long the video is. In the event it gets corrupted, you may experience issues during playback or the media player could refuse to play it at all.
Since fixing the corrupted video file header can be quite technically demanding, the simplest and most time-efficient method is to use a professional video retrieval and analysis solution.
VIP 2.0 by SalvationDATA allows you to fix corrupted video headers in just a few clicks, without requiring any technical knowledge.
Method #3: Try a different codec/media player
Since different media players support different codecs, the one you’re using may not be compatible with the video footage recorded by HikVision CCTV, thus throwing an error as you attempt to play it.
There are multiple solutions: you could either install the codec separately or install a different media player.
Once again, it’s worth noting that the Ultra Player feature of VIP 2.0 supports virtually all codecs in existence and is one of the fastest ways to resolve your codec issue by far, so you can spend more time cracking the case and less time on technical setbacks.
Method #4: Restore the footage from a backup
If you have one available, you could do a backup restore to access the CCTV footage you’re looking for. In fact, most HikVision DVR models come with scheduled backup functionality.
However, there is a flip side to this. Over time, the older footage gradually gets replaced by the new one, in which case you’re going to require DVR deleted data recovery software such as SVR by SalvationDATA to restore it.
This particular one is a one-click solution that works with all HikVision models.
Method #5: Use the command line on Windows
One of the ways to restore deleted files in Windows 10 is to use CMD. However, this may require advanced computer knowledge to execute properly.
Nevertheless, we’ve broken the process down into a few easy-to-follow steps:
Open the Start menu and launch CMD through the Run interface. Alternatively, you could also press the key combination “Windows key + X”.
Once the CMD window is open, enter the command chkdsk c: /f (that’s assuming the disk is using the label “c:”, otherwise use the appropriate label)
Press ENTER.
Wait until chkdsk completes the process and fixes any errors encountered during it.
The Ultimate Method: Advanced Video Repair and Forensics Software
If the methods suggested above fail, you need more advanced video retrieval software like VIP 2.0. Much like SVR for HikVision, VIP 2.0 helps you process the evidence in a forensically sound manner, with the addition of integrating industry-grade video forensics functionality.
In case the CCTV footage is corrupted or damaged in any way, it automatically diagnoses the problem and fixes it if at all possible, without requiring any technical knowledge on your end.
For example, let’s say you’re looking for footage containing a red vehicle that is headed towards the north. Traditionally, you would have to go through all the footage manually. However, since it would take up a considerable amount of manpower, it’s hardly the most time-efficient way to approach things.
VIP 2.0, on the other hand, can do this automatically for you, along with being able to recover key footage by scanning for the following variables:
Faces
Patterns
Movement
Direction
Colors
Area of interest
etc.
For quick and further understanding, we invite you to watch a short 5-minute demo for a better understanding of what VIP 2.0 can do and how easy it is to restore deleted files with it:
Quick Tips to Prevent Similar Issues in the Future
Do NOT remove storage media when an operation is running
Be gentle when handling CCTV gear
Mind what files you delete
Avoid using the device when the battery is low
Don’t be too rough when inserting or removing the memory card
Stop using the hard drive if you hear any clicking noises
DO NOT try to repair the hard drive on your own if it gets damaged by fire or water (leave it to a professional)
Other Considerations to Make
Across the industries, digital evidence remains an important factor, even outside of law enforcement. Whether you’re a corporation, a special organization, or an individual who’s trying to protect the safety of your loved ones and your property, it’s crucial to have at least the basic HDD data recovery skills.
Recovering the video footage is one thing, but you also need to take other things into account. For instance, do you know how to make the video evidence collected admissible in court?
To meet the admissibility criteria, proper forensic procedures need to be followed pertaining to the video evidence
Forensic video enhancement
Extraction
Analysis
Reporting
Long story short, a professional forensic video analysis tool like VIP 2.0 incorporates all of this and more. When the outcome of a case is yet to be decided, it could very well be the one thing that tips the scales in your favor.
Conclusion
When time is of the essence and the outcome of a forensic investigation is at stake, you simply cannot afford to waste any of it by throwing things at the wall and seeing what sticks – you need professional industry-grade hard drive forensics tools that can withstand the complexities of any situation.
With the help of our in-depth guide, you should now be equipped with the tools and knowledge in case you need to recover corrupted or erased video from any HikVision CCTV camera model.
Given how both VIP 2.0 and SVR by SalvationDATA come with a no-strings-attached free trial, we encourage every forensic DVR examiner to make it easy on themselves and give it a shot.
 1")