FAS7900 – A streamlined forensic acquisition system for fast, non-invasive data extraction and analysis, without the need for computer disassembly. Supporting multiple OS, it captures memory and disk images, and includes secure data wiping.
Forensic Expansion Dock – A compact solution for fast, reliable data acquisition from various storage media. With support for multiple interfaces, it ensures secure, stable, and high-speed forensic data transfer for streamlined workflows.
DFIR Phases: What Are the 6 Phases of a Cyber Security Incident Response Plan?
Work Tips
2022-05-11
When a digital disaster strikes, you’d better have a plan. Otherwise, every single second you delay remedying the situation only contributes to the overall damage and your organization will suffer, thus racking up the costs and further eroding the trust of your clientele.
A cyber security incident response plan consists of 6 steps:
Preparation
Identification
Containment
Eradication
Recovery
Lessons learned
Although these are somewhat debatable and not always in the same order, for the most part, any DFIR cyber security expert will agree that the most optimal strategy more or less consists of the elements outlined above.
To implement them successfully, essential DFIR training is required. Once your IT and cyber security team gets the experience necessary, the fine details of it can be adjusted as per your individual needs.
Today, we’ll cover each of these steps in detail and outline the underlying philosophy that goes into their making.
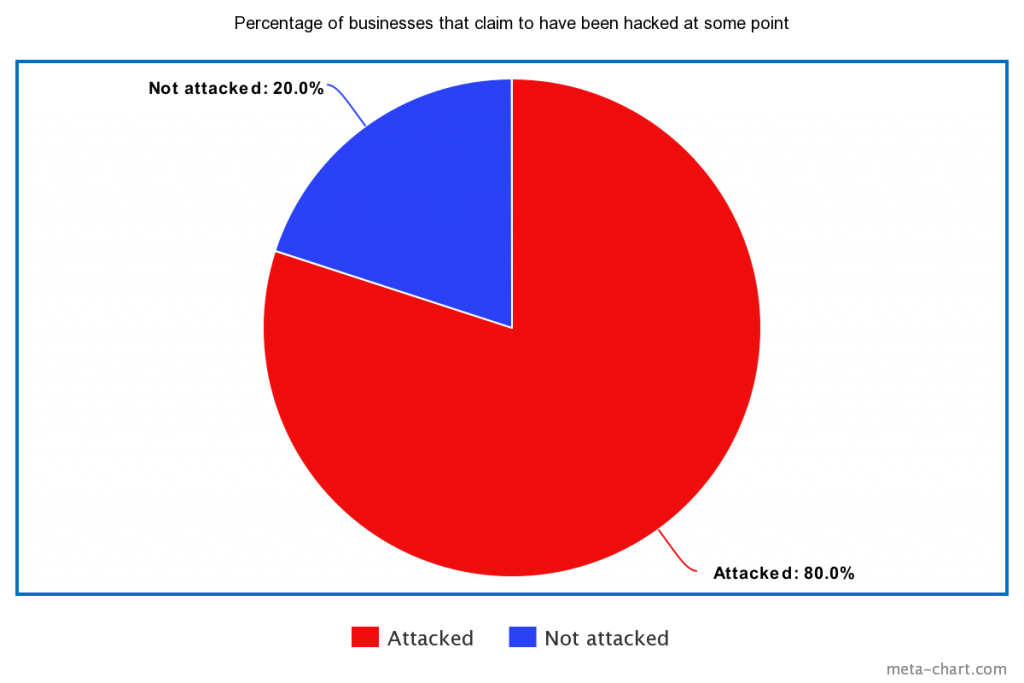
A cyber incident response plan operates under the assumption that any organization will get attacked at some point. This is based on concrete statistics and facts. According to Duke University, more than 80% of US businesses claim to have been hacked in the past, and the global statistics are not that much different.
Furthermore, having an incident response plan is a PCI DSS compliance requirement, which is very much relevant for those businesses that accept credit card payments. But even if this does not apply to you, these DFIR phases will be of significant importance if your organization stores any kind of sensitive personal data that needs to be protected at all costs.
A cyber security incident response plan is also a matter of PCI DSS compliance.
The questions we're trying to answer during the investigation
What is going on?
How did it happen?
When did the incident take place?
Who is behind it all?
Why did it occur?
Getting to the bottom of things is the main point and one of the key things to remember about DFIR and its underlying principles. Although every digital forensics incident response is unique in its own right, these questions lie at the forefront of them all.
The 6 DFIR phases
Below, you’ll find the 6 DFIR phases every digital forensics and incident response plan consists of:
1. Prepare
This is the brainstorming phase where your organization will be getting ready to respond to the vast digital threat landscape that’s out there. But in order to do so, an accurate assessment of the potential cyber security threats is required.
One of the crucial steps of the preparation phase is to come up with a policy on how to protect your customers’ sensitive data. This may involve bolstering the organization’s infrastructure if need be. Moreover, your staff should have at least the basic understanding of network and information security and how to identify the most common cyber threats, including malware, phishing, man-in-the-middle attacks, and similar.
This is also the time to discuss every team member’s role and responsibilities in the unfortunate event of an attack. Practice mock scenarios and educate them on the go. You should take inventory of the most crucial elements of your network. Consider hiring a third-party auditor to help you if you believe this is beyond your area of expertise.
Last but not least, document everything. When you have it all on paper, it’s easy to see the steps that you still need to take.
2. Identify
When you suspect you’ve sustained a breach, you should start investigating the situation immediately. Are you noticing any strange patterns or anything that’s out of the ordinary? Don’t turn a blind eye to your findings and seek the help of a forensic cyber investigator if needed.
In case you’ve discovered digital evidence that suggests a breach has taken place, you should assess what is the extent of the damage and whether your organization’s ongoing operations are affected. Try to get to the bottom of the breach by identifying where the hackers got in.
Can you tell when the incident occurred? At the very least, try to give it an estimate. Give credit where credit is due. Once again, document everything as you’ll need it later on as a reference point.
3. Contain
In the containment DFIR phase, you’ve now firmly established that the cyber security incident has indeed happened. Even though your first instinct may tell you to delete everything and start with a fresh install, DO NOT touch any data on your hard drive – you risk destroying vital digital forensic evidence by doing so.
Instead, your goal should be to contain the breach and prevent it from spreading to other parts of the network or systems connected to it. As a preventative measure, it’s best to take your operations offline for a while, so you should make sure every connected device is disconnected before you proceed.
If you’ve been practicing good cyber security hygiene, you’ll have some backups ready to deploy. You should also change your passwords, update your operating system and any software that you’re using, as well as review your remote access protocols.
4. Eradicate
By now, you’ve hopefully gained an understanding of what caused the breach in the first place so you can proceed to eradicating the cyber security threats. This is the time to tackle the issue head-on and do some serious work.
Have you updated the OS and software? Don’t forget to download the latest antivirus updates too, then run a thorough scan. Don’t forget that an essential part of every DFIR strategy is to preserve evidence, so try to safely isolate the malware that’s causing problems rather than wiping it out completely.
If you’ll be pursuing criminal charges, you need to make sure the digital evidence collected is admissible in court. If you need further guidance on the matter, consider working with a DFIR services provider.
Keep in mind the eradication phase is meant to be thorough. Otherwise, the malware could resurface (or, if you’ve left the initial point of entry unpatched, the hackers could use the same approach to repeat the attack).
Another reason to not skimp out on any details is your liability. Remember that, in the event of a breach, you have a legal responsibility to do your due diligence and eliminate any further threat to your customers’ sensitive personal data. Should you sustain another attack, your liability will amplify.
5. Recover
Once you’ve removed the cyber security threats and secured the digital evidence, it’s time to pick up the pieces and begin the recovery phase of DFIR. Focus on getting everything back up and running again in the shortest amount of time possible. Every minute you delay could cost you a potential customer or sale and put a dent in your reputation.
Mind that your systems should only go back online if you’ve made sure that everything has been updated and patched and that no traces of malware remain on any of your systems. Check and double-check things until you’re confident you’ve done everything in your ability to keep your network secure. Run several tests to confirm. If you’re not comfortable doing this yourself or lack the knowledge needed, it’s recommended to seek out a DFIR services provider to help you out.
Note that you don’t have to get every single device back online; just the ones that have been cleared to be malware-free. Focus on the servers and devices that are the most crucial for your operations. Remember the devices you’ve chosen to restore should be closely monitored for any suspicious activity to ensure your efforts have not gone to waste.
6. Lessons learned
Finally, you should meditate on what you’ve learned and see if you can use that knowledge to prevent a similar cyber security breach from occurring in the future. As unimportant as this particular phase may seem in comparison to the others, the fact of the matter is that those who are unwilling to learn to make for an easy target for the hackers to exploit times and times again.
The reality is, that an incident like this can happen to anyone, even those who are educated on the subject. But how you react to it can make for a night and day difference.
After going through each of these DFIR phases, gather your team members and discuss the events that transpired. Make sure everyone did their part and completed their duties. In case you’ve been documenting each and every one of these steps (as you should), getting up to speed with the matter at hand shouldn’t take too long.
Reviewing the documentation will let you conclude what has been done and whether everyone involved has followed up on their responsibilities. In case your organization has sustained a breach despite having a plan in place:
Could anything have been done differently?
Could anyone have responded faster or more efficiently?
Has the vulnerability been patched on every system?
Note any potential improvements that come into your mind. In case any team member requires further DFIR training, find a way to provide it.
Above all, don’t fall into the trap of self-blame. What’s done is done. You can, however, make the changes necessary to prevent a situation like this from ever happening again or at least minimize the risks.
Conclusion
When there’s time to respond to a critical situation, you can’t afford to waste any time on coming up with a plan. Instead, you should prepare one in advance so that you can keep your cool even in the worst-case scenario.
Keep in mind that a cyber security breach can have serious consequences not only for your customers and the safety of their sensitive data, but also for your company or organization’s public image. With the lack of a cyber security incident response plan, the latter will be the least of your problems, as regulatory fines of astronomical proportions are bound to follow.